
|
Step 01
|
|||||
 |
||
 |
||
 |
||
 |
||
 |
||
 |
||
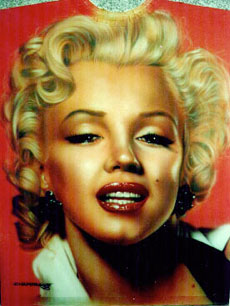
| Portrait - Marilyn Monroe | |
| This is the finished product. I wanted to begin with a picture of the final piece so you might understand the steps in my process better. If this t-shirt shaped thing looks a bit weird to you, it should. This is actually a piece of masonite which was used as a sign on the outside of an airbrush shop. |
 |
|
Step 01
|
|
| This is an exaggerated example of the lines I sketch out when beginning a portrait. They are far darker than needed for reference, but it is necessary here to illustrate the usage and placement. This sketch was done on posterboard with a marker and the assistance of an opaque projector. Normally, I would use a soft leaded art pencil or a matching color pencil to keep the lines somewhat faint. When working on a t-shirt, these lines will be covered with paint and will not wash out after heatsetting, therefore they must be laid only where necessary. LIGHTLY spraying the shirt board with spray ashesive will also make the sketching process easier as the point of the pencil has a tendency to grab and stretch the fabric. Likewise, on illustration board or canvas, the lines can't be erased after work has begun without destroying the delicate layers of paint. Comparing with the final portrait, you can see where the lines are placed; sharp edges, dark areas, areas where detail will be added that will camoflage any lines that still show. Note there are no lines to define shadows or lines around light, soft shaded areas. Those lines would not be covered with the paint and would be almost impossible to blend out and WOULD NOT WASH OUT on t-shirts. A few lines are used in the hair to show direction of the hair's flow and various locks. |
 |